There are many reasons why you may want to use a third party script for processing your forms. These reasons usually centre around server security and anti-spam measures implemented by hosting companies. In many cases, changes can be made to the server configuration by getting in touch with your hosting company’s support team, but despite efforts to correct the issues, you may still experience non-delivery of emails from your Sparkle forms. One way of minimising the chances of that happening is to implement a third party script to handle all your form processing requirements. However, a word of caution:
Not all form scripts are created equal - some may contain vulnerabilities that can expose your site to malicious spam attacks. Therefore, it is recommended to always use Sparkle’s in-built form processing function wherever possible. In most cases, Sparkle’s option provides a safe and effective form processing environment all within the app.
Therefore, the use of third party scripts is only recommended as a last resort, when you are unable to resolve any problems you may experience using the Sparkle option. Sparkle recognises this, and does provide an option to use a third party script if necessary. Due to the large variety of script options out there. the Sparkle documentation can only offer basic usage details for this feature. In this document, we explain the feature in more detail as it relates to a particular script. Hopefully, this will give you a better insight into how the Advanced Form Submission option can be used.
In this guide, we’ll walk you through setting up a third party script which has a good history of overcoming security vulnerabilities, and provides a few additional features that can make your form processing a lot smoother. By following this guide, you will be able to quickly and effortlessly add a script to your website that solves many problems.
Upload to your server
The normal way to upload to your server is to use your web hosting cPanel. Select the file option and use that to upload the script to a location on the server. The best thing to do is create a folder within your domain named something like ‘mySiteMailSys’. Upload the script directly into that folder.
If you publish your Sparkle site to disk and then upload via an FTP client, you could create the folder and add the file directly into the publish folder on your disk. This will then get uploaded when you next FTP your site.
Your now all set to start creating your forms in Sparkle.
Creating your Sparkle Forms
You create your forms in Sparkle in exactly the same way as you would if you were using Sparkles own in-built forms processor. Just add all the form fields to your page as normal. When the form is how you want it, you’ll add some additional fields that instruct your new form script how to deal with your form. These are called hidden fields and must be present in every form you create.
The fields you will add will have specific variable names. In your main form, your fields will have variable names such as name, email-address and message. This is so you know what the information is when you receive the form contents in your email.
Our special hidden field will contain information that won’t be sent to you as part of the response - instead, they will be used give additional information to the script which table it to do its job correctly.
The fields you will add to your sparkle forms will have the following variable names:
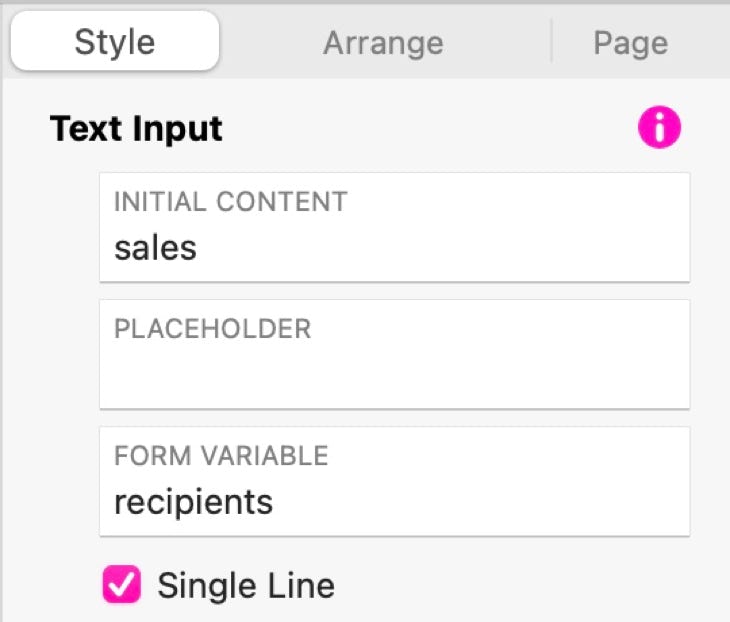
recipients
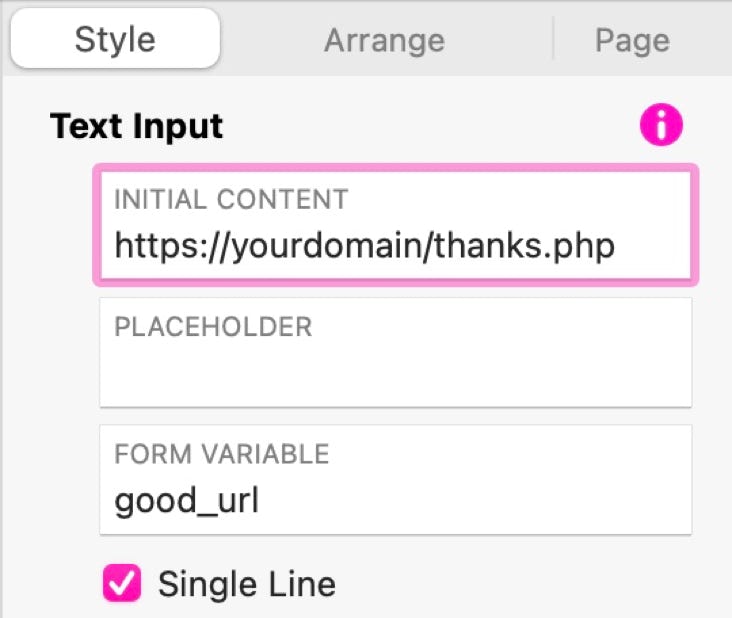
good_url
bad-url
The first field, recipients, will contain the alias name for the person to receive the response. If you remember, aliases were added to the script Therefore, when you add this field you will enter the appropriate alias name as the Initial Content of the field. For example, if I wanted my form to go to the sales email address, I would set up the recipient form field in Sparkle like this:
The good_url field will be set up exactly the same but will contain the full URL of your success, or thank you page of your website. It should look something like this:
Finally, the bad_url field will contain the full URL of a page in your website to notify users if there was a problem with the form submission. Typically, it will be set up something like this:

Hiding the fields
Clearly, you don’t want these fields to be seen by your site visors, and you certainly wouldn’t want them typing information into them. Therefore, you need to hide these fields from view. One of the best way of doing this is to overlay them - one on top of the other, and then group them. You can then place the group of fields onto your form and place a submit button on the top of them to obscure them from view. This is how the button would look on the canvas with the hidden fields all grouped behind the button:

Setting Up the form Submission Details
Now you have your form created, you have to tell Sparkle what to do with it. Select the submit button and choose Advanced Form Submission over in the style inspector. Check the boxes for ALL the fields on your form and then set the URL of your script on your server. It will be in the format something like this:
https://yoursite.com/yourScriptFolder/yourScriptName.php

Time to Test
Whilst you will not be able to test your form in Sparkle’s preview, you can publish to a disk folder and test from there. If all goes well, you should get redirected to your thanks page after form submission. If that happens, check your email to ensure you receive the results.
If youset up a bad_url page in your site, and you get directed there, it will mean the form submission failed. However, if that happens, you should still get an email from the system indicating that there was a problem.
Configure the Script
When you open the script in your text editor, you’ll be confronted with a page full of PHP code - don’t be put off by this. The edits you’re going to make are very simple - just take your time and follow the syntax exactly. First you need to scroll down the page quite a bit to a section that says Configuration - it looks like this:
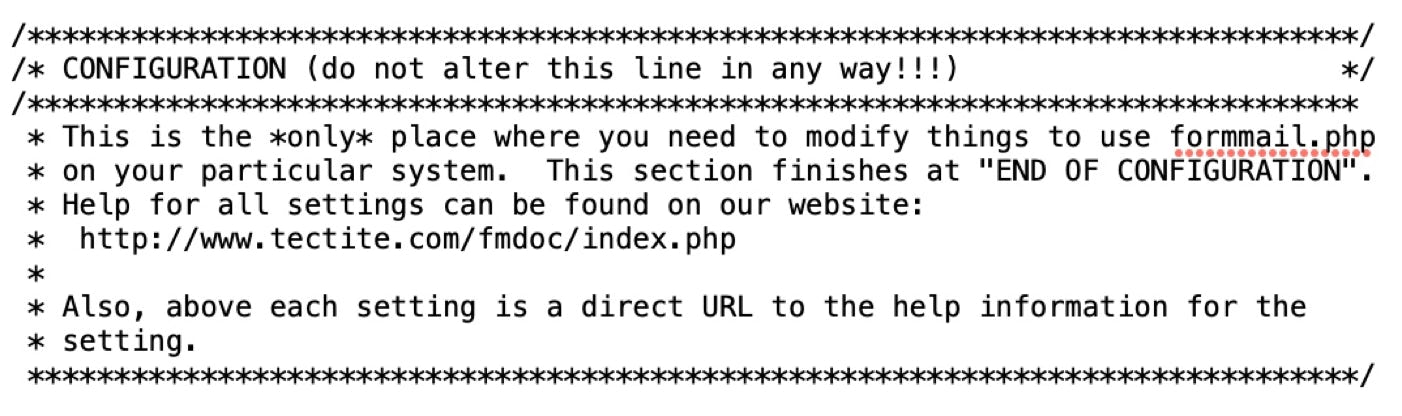
Don’t worry - it isn’t half as scary as it looks!
The first edit you are going to make is the line that begins with $TARGET_EMAIL. This setting restricts the domains that the script can send messages to. So, typically, you will add to this line your domain name to ensure that the the script can only send information to email addresses ending with your domain name. This is what the default setting looks like:
$TARGET_EMAIL = array($EMAIL_NAME . "@yourhost\.com$");
All you have to do is change the bit in Red to match your email domain name. If you don’t have a .com domain, you will also have to change the bit in Green to the domain extension you have (.org, .net etc). If you have a double domain extension, such as .co.uk, you will have to add it in the format .com\.uk. Leave all other characters as they are - only change the bits highlighted above in Red or Green
Cautionary Note: Try to avoid using public email domains such as gmail or yahoo - doing so may compromise this important security feature of the script. If you have a half-decent hosting account, you will be able to set up domain specific emails.
The next line you will edit is the one that begins with $EMAIL_ADDRS. This setting is used to create aliases for your real email addresses which means you never have to disclose recipient email address in your HTML pages. This will be explained later when we take a look at creating forms in Sparkle. The default line looks like this:
$EMAIL_ADDRS = array();
All you have to do here is add some lines BETWEEN the brackets. The information you add will comprise¡se of an alias name, followed by a full email address. These two pieces of information will be separated by the symbols => and enclosed in single quotes. Here’s an example:
$EMAIL_ADDRS = array(‘moreinfo => info@yourdomain.com’);
What this line does is tell the script that when it receives a form that is destined for a recipient named moreinfo, it should send the details to a real email address of info@yourdomain.com. You will see the significance of this a little later.
You can add multiple aliases to this line. For example, you may wish to set up aliases for a sales department, and one for a support department you may just want to add multiple people, such as John or Mary. You add these Aliases in exactly the same way - just make sure they are all contained within the brackets. Here is an example:
$EMAIL_ADDRS = array(‘moreinfo => info@yourdomain.com’,
‘sales => sales@yourdomain.com’,
’support => support @yourdomain.com’,
‘john => john @yourdomain.com’,
‘mary => mary@yourdomain.com’
);
Just remember, that each alias must be enclosed in single quotes and separated by a comma.
By setting up this option in the script, all possible email addresses where your form results can be sent will remain safely hidden from spam bots and others who may want to harvest your email addresses.
The final edit you have to make is the the line that begins DEF_ALERT. This will typically be the email address f you site administrator. Essentially, if there is an error in sending a form, or if someone attempts to compromise your script, the system will send an alert message to your site administrator with a description of the issue. This is what the default line looks like:
$DEF_ALERT = "";
All you have to do here is add your administrator email address between the quotes. Something like this:
$DEF_ALERT = "webmaster@yourhost.com";
You’re now all set to go. Save your edits and get ready to upload to your server.
Downloading the Script
The script we are recommending is Tectite Formmail - this shouldn’t be confused with other scripts with similar names. This particular script has been around for many years and has not exhibited any security vulnerabilities that we know of. You can download a free copy of the script from the link below.
Please Note: Ensure that your web hosting supports PHP - most do, but some low price or free hosting services don’t.
The developer of the script does offer a configuration option for which they make a nominal charge. But, if you’re up to it, download the free script and make the relatively few minor edits yourself. After downloading, you will see a folder in your downloads folder named formmail. Inside the folder will be three files - the latest version of the script named formmail.php, a previous version with the name formmail(version number).php, and a sample HTML form.
The first thing you should do is make a copy of the formmmail.php file and give it a more meaningful name - for example ‘your-domain-mail.php’. You’re now all set to go and ready for making a few small edits to the script. For this you will need a plain text editor - you can use Apple’s Text Edit app for this. Just click on the script file, right-click and choose open with - then choose Text Edit from the context menu.