Multi-Playlist Audio Player
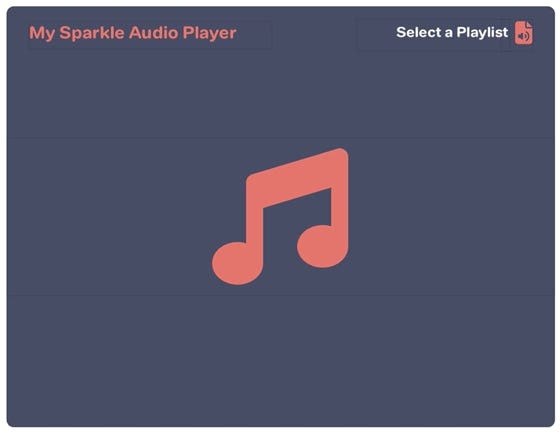
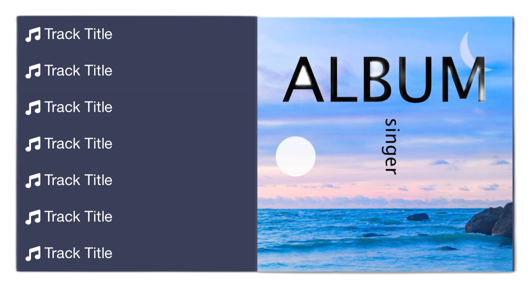
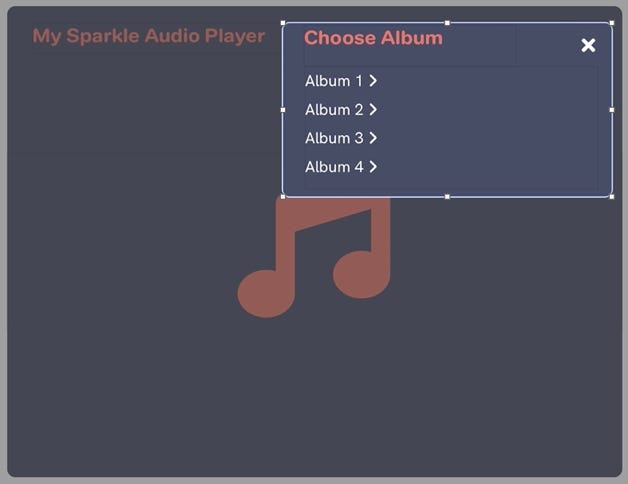
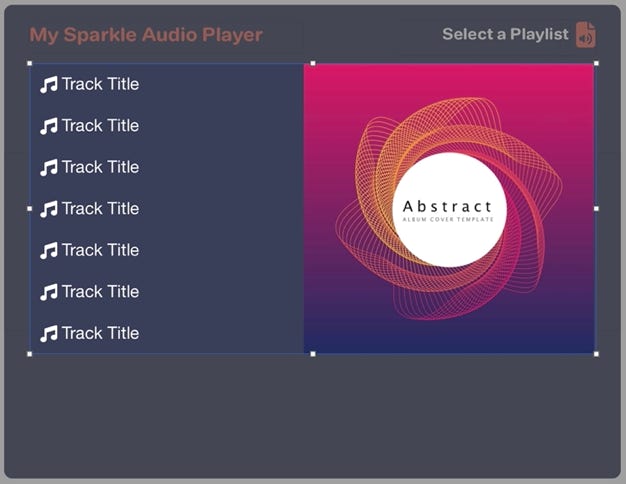
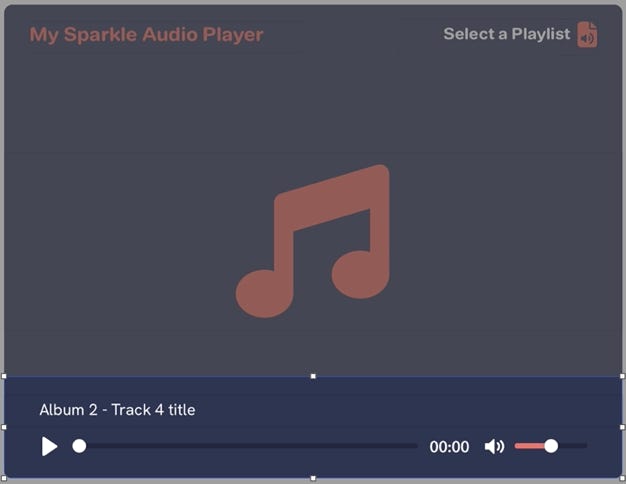
The audio player below has been created entirely in Sparkle, and features a multi-playlist, multi-track player. Users start by selecting a playlist by clicking on the icon in the top-right corner. They can then choose which playlist they want from a small popup menu. Selecting a playlist, will open it in the main player window. Selecting individual tracks will open the player at the bottom of the interface and will automatically start playing the track. The track will continue to play until another track is selected, either from the current playlist, or another one.
This is a working example - please feel free to explore


Album 1 - Track 3 title
Album 1 - Track 5 title
Album1 - Track 6 title
Album 1 - Track 7 title
Album 2 - Track 1 title
Album 2 - Track 2 title
Album 2 - Track 3 title
Album 2 - Track 4 title
Album 2 - Track 5 title
Album 2 - Track 6 title
Album 2 - Track 7 title
Album 3 - Track 1 title
Album 3 - Track 2 title
Album 3 - Track 3 title
Album 3 - Track 4 title
Album 3 - Track 5 title
Album 3 - Track 6 title
Album 3 - Track 7 title
Album 4 - Track 1 title
Album 4 - Track 2 title
Album 4 - Track 4 title
Album 4 - Track 3 title
Album 4 - Track 5 title
Album 4 - Track 6 title
Album 4 - Track 7 title
Album 4 - Track 7 title
Album 4 - Track 7 title
Album 4 - Track 7 title
Album 4 - Track 7 title
Album 4 - Track 7 title
Album 4 - Track 7 title
Album 4 - Track 7 title
Album 1 - Track 1 title
Album 1 - Track 4 title
Album 1 - Track 2 title
How it’s created
The basic interface is made with a standard box from sparkle’s toolbar. In the example above there was one large background box with rounded corners. The text and icon elements were created in text boxes and overlaid onto the background. The playlist icon is a standard icon in a text box with an on-click action of open popup. No need to worry about adding a popup name at this point - that all happens at the assembly stage.
Basic Interface component
Group the elements to make a single moveable object.
The next phase is to design your playlist popup. This is the list that will appear when the playlist icon is clicked. It’s sized to fit in the top quarter of the player interface. Its styled to match the main interface and contains a text box for the title, and a text box for the links. A close button is also included which is resized to match the approximate size of the playlist icon. Each of the text links should be set to open popup - again, don’t worry about the popup names at this point. Give your popup a name, such as ‘playlist’ and give it a Group ID of 1.

Playlist Component
This is optional. If you don’t want to create multiple playlists, skip this step
Next you’re going to create a track-list popup. This is designed to sit in the centre of the interface and will typically contain a set of buttons that will trigger each track. You could also include a graphic, as illustrated in our example. Each of the button links should be set to open popup. The popup itself should be given a Group ID of 1. Give your track-list popup a name, such as ‘tracklist’
Track-list Component
The final component to be made is the actual audio player popup. This should be designed to sit at the bottom of the main interface and should extend to the full width of the interface component. TIP: Use Sparkle’s arrange inspector to set the width of this component - it should be the same pixel width as the main interface component - this helps with alignment when it comes to assembling your player component. Remember, if you’ve set rounded corners on your main interface component, be sure to set BOTTOM rounding on the audio player popup to match. The audio player popup should contain an audio player element from Sparkle’s toolbox. Style it to match the colour scheme of the main interface component. You can optionally provide a text placeholder for a track title so users will know what they are listening to. Because the audio player element has been set inside a popup, you will see some additional styling options in the style inspector. They are Start when Popup Opens and Close Popup at End - both of these options should be checked. Finally, set the Group ID for the player popup to 0 - Don’t worry about adding an MP3 file at this point.
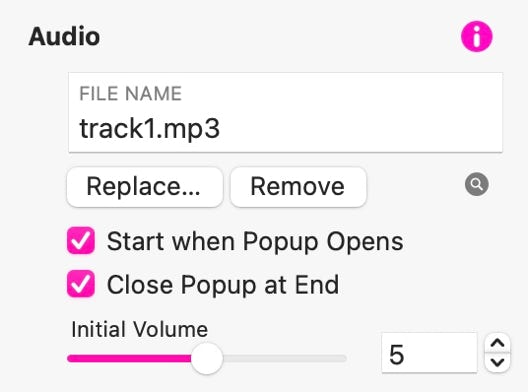
Audio Player Settings
Audio Player Popup Component

Final Assembly
Now that you’ve created all the components, it’s time to let the fun begin. Start by positioning your main interface component on the page - this should be its final resting place on the page if you want to avoid moving popups around later. Start by opening your playlist popup - select it from the popup icon at the top of Sparkle’s interface - it looks like this.
Size and position the popup so that it sits in the right top quadrant of the interface - it should cover the playlist icon in the interface.
Positioning of the playlist popup
This is optional. If you don’t want to create multiple playlists, skip this step
Next, open your track-list popup and position it in the interface.
Positioning of the track-list popup
Lastly, add your audio player popup and make sure it fits snuggly at the bottom of the interface. If you followed the recommendation earlier to use the sizing options in Sparkle’s arrange inspector. you should find the audio player popup snaps into position.
Positioning of the audio player popup
You can make some final adjustments by changing the size of the interface element, or any of the popups.
Tying it all together and adding audio files
To better understand how this player works, just remember that EACH track will have its own audio player popup. Each of those popups will be triggered by a link in a track-list. So, if you have a total of 10 items in your track-list, you will need 10 audio player popups. But don’t worry, these are easy to create.
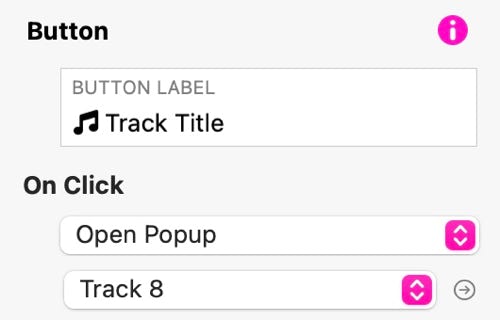
Open the audio player popup you created above. In the arrange inspector, give it a name to indicate which track it belongs to - in our example, we simply used ‘track 1’, ‘track 2’ etc. to name our popups. We also gave the same names to the MP3 files we used. With the popup open, select the audio player element and add your first MP3 track in the style inspector.

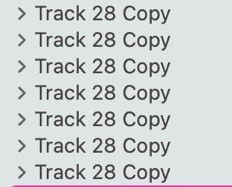
Go back to the popup icon and open your newly named audio player popup - it will now be selected on the canvas. Before doing anything else, press command+c on your keyboard. You can now close the popup with the close button at the top of the screen. Next, press command+v on the keyboard to paste a new audio player popup into the interface. It should already be correctly positioned, so all you have to do is give it a name and add your second MP3 file. Repeat this process for each MP3 file you wish to add to your player - press control+v a number of times to create multiple audio player popups. These will all appear in the layers panel with same name as your first popup, but with the word copy appended to the name. Keep pasting popups, one for each track you wish to add to the project. When you’ve created each popup, simply step through them, one by one and add an MP3 file to the audio player element, and give each popup a suitable name.
Duplicate as many audio player popups as you need for the whole project, regardless of the number of track-lists you may have.
Now that you have all your audio player popups populated with audio files, it’s time to start working on the track-lists. Open your first track-list popup and add links to each button. The on-click action of open popup should have already been set up when you first created the track-list popup. so, with a button selected, go over to the style inspector and add the name of the popup that the link opens. The popups are the audio player popups for the relevant tracks.
If you’re creating multiple track-lists, select the track-list you’ve already created and press command+c, command+v to duplicate it - just like you did with the audio player popups. After giving the new track-list a name, edit it to reflect your next set of audio player popups. Do this for as many track-lists as you want. Finally, go to your playlist popup and set the links to open your track-list popups.
Although you may not have a need for an audio player like this, it’s a good exercise to work through to better understand how popups work in general. Used creatively, they can add a whole new level of interactivity for your users.